Follow these "4" simple steps to achieve perfectly stamped images right away.
Don't worry, this information is included on the pamphlet inside your stamp's envelope.
Step One: Using the side of your forefinger, gently loosen the stamped image on all sides, then slowly peel the stamp from its carrier sheet.
(When using a stamp for the first time, it's recommended to *season your new stamp so it will pickup more ink to stamp evenly. Sometimes if you don't season your stamp you might experience ink beading up, and or portions of your image not stamping correctly. More information regarding seasoning your stamps is listed below.)
Step Two: Center the image on the appropriately sized My Acrylix® Block. When using alphabet stamps, we recommend lining your stamps along the handy white line along the bottom of our exclusive clear blocks to achieve accurate stamp alignment.
Step Three: Ink the stamp(s) with your preferred Exclusive Ink color. Look through your clear block to verify whether or not you have even ink saturation on your stamp(s). Re-ink if necessary.
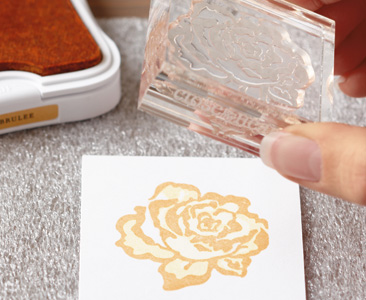
Step Four: Once you've decided on the desired location being stamped, apply even downward pressure on your block while watching the transfer of ink to paper. Make any necessary corrections in pressure by walking your fingers around the top of the block before lifting the stamp off your project. My Acrylix® clear stamps make it possible to re-stamp an image if you didn't press enough downward pressure, or achieve adequate ink saturation.
Don't worry, this information is included on the pamphlet inside your stamp's envelope.
Step One: Using the side of your forefinger, gently loosen the stamped image on all sides, then slowly peel the stamp from its carrier sheet.
(When using a stamp for the first time, it's recommended to *season your new stamp so it will pickup more ink to stamp evenly. Sometimes if you don't season your stamp you might experience ink beading up, and or portions of your image not stamping correctly. More information regarding seasoning your stamps is listed below.)
Step Two: Center the image on the appropriately sized My Acrylix® Block. When using alphabet stamps, we recommend lining your stamps along the handy white line along the bottom of our exclusive clear blocks to achieve accurate stamp alignment.
Step Three: Ink the stamp(s) with your preferred Exclusive Ink color. Look through your clear block to verify whether or not you have even ink saturation on your stamp(s). Re-ink if necessary.
Step Four: Once you've decided on the desired location being stamped, apply even downward pressure on your block while watching the transfer of ink to paper. Make any necessary corrections in pressure by walking your fingers around the top of the block before lifting the stamp off your project. My Acrylix® clear stamps make it possible to re-stamp an image if you didn't press enough downward pressure, or achieve adequate ink saturation.

 RSS Feed
